How to Set Stop Losses A Trader's Practical Guide
A stop loss is a simple concept with a powerful impact: you place an order with your broker to automatically sell a security if it drops to a certain price. That’s it. But its real job is to act as your primary defense against your own worst instincts, pulling you out of a losing trade before emotion takes over and capping your potential downside.
Think of it as your financial eject button that works even when you're not at the controls.
Why a Stop Loss Is Your Most Important Trading Tool
Before we jump into the how, we need to internalize the why. A stop loss isn't just another order type—it's the bedrock of capital preservation and the secret to staying emotionally disciplined. Its entire purpose is to force you to define your maximum acceptable loss before you even click "buy."
This single act is what separates disciplined traders from gamblers. It systematically removes the two most destructive emotions from your trading process: fear and hope. Without a stop loss, it’s far too easy to cling to a losing position, hoping it will rebound, only to watch a small, manageable loss spiral into a catastrophic one.
A Tale of Two Traders
Let’s make this real. Imagine two traders, Alex and Ben. They both buy shares of a hot tech stock at $100, convinced it's heading for the moon.
- Alex sets a stop loss at $95. He’s decided he’s willing to risk a maximum of 5% on this trade. No more.
- Ben skips the stop loss. He’s confident in his analysis and feels good about the stock's prospects.
Then, unexpected market news hits, and the stock tanks to $90.
Alex’s stop loss triggers automatically at $95, closing his position with a controlled, 5% loss. He's not happy about it, but his capital is mostly intact, and he's mentally ready for the next opportunity.
Ben, on the other hand, watches the drop and hesitates. "It'll bounce back," he tells himself. But it doesn't. The stock keeps sliding to $80, and now he’s staring down a 20% loss, paralyzed by indecision.
A triggered stop loss isn't a failed trade; it's a successful execution of your risk management plan. It means your system worked exactly as intended to protect your capital.
This scenario gets right to the heart of why stop losses are non-negotiable. They enforce discipline at the very moment your judgment is most likely to be compromised.
Interestingly, while this tool protects you, the collective use of stop losses can ripple through the market. When tons of stop-loss orders are stacked around the same key price level, their simultaneous triggering can act like rocket fuel for a price drop. In fact, some research shows that markets with stop-loss orders can see volatility increase by as much as 27%. It’s a powerful reminder that while you're managing your own risk, your actions are part of a much larger, interconnected system.
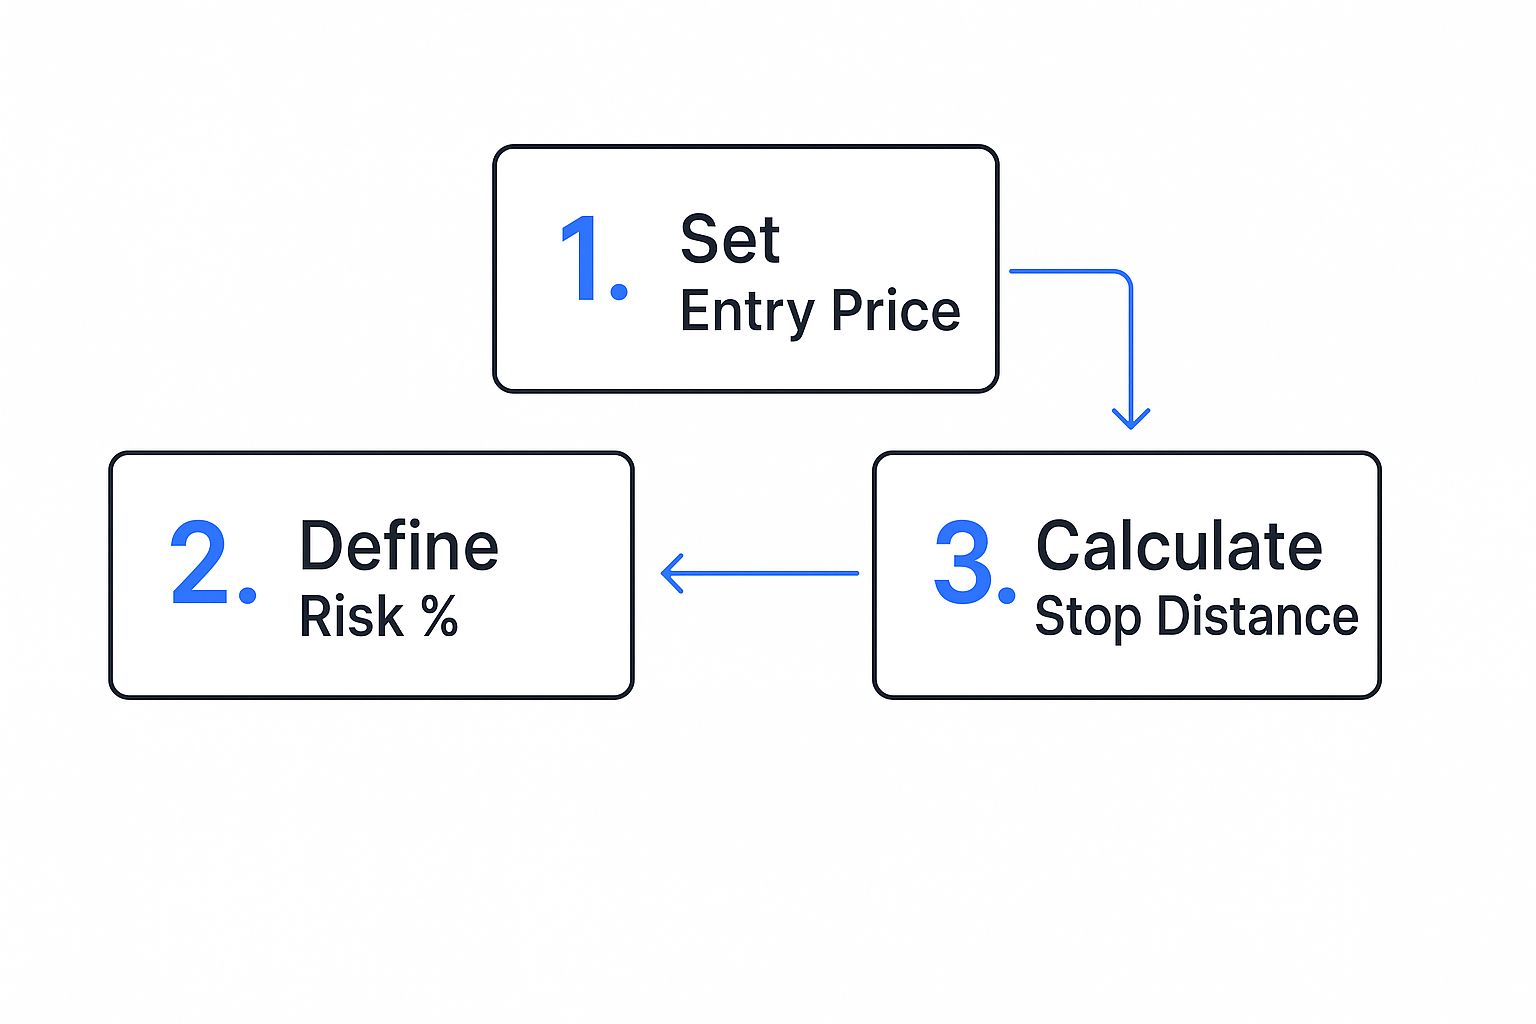
Finding the Right Place for Your Stop Loss
Knowing you need a stop loss is the easy part. Figuring out exactly where to place it is what separates a well-executed trade from a frustrating, premature exit.
There isn't a single magic formula here. The real goal is to align your stop with actual market behavior, not just random guesswork. You need to give your trade enough breathing room to fluctuate naturally without exposing your account to a devastating loss.
Let's walk through three battle-tested strategies that traders rely on every single day.
The Straightforward Percentage Method
This is the most direct approach to managing your risk, hands down. You simply decide on the maximum percentage of your trade’s value you are willing to lose and set your stop loss at that price level.
It’s a simple calculation. For instance, if your personal rule is to never lose more than 5% on any single position, your stop is already figured out.
- Example Scenario: You buy 100 shares of a blue-chip stock at $200 per share, for a total position of $20,000.
- Stop Calculation: A 5% stop loss puts your exit price at $190 ($200 - [$200 * 0.05]).
This method is fantastic for maintaining strict portfolio-wide risk discipline. The main drawback, though, is that it completely ignores the stock’s unique volatility or the market's structure. A 5% drop might be normal daily noise for a tech stock but a massive red flag for a sleepy utility company.
Using Support and Resistance Levels
A more technical approach involves placing your stop loss based on key levels you can see right on the chart. Support is a price level where buyers have historically stepped in to halt a downtrend. Resistance is the opposite—where sellers tend to emerge and stop an uptrend in its tracks.
By placing your stop just below a strong support level for a long trade (or just above a resistance level for a short), you're essentially letting the market prove you wrong. If that key level breaks, it's a powerful signal that your initial analysis was likely incorrect, and it's time to get out.
A crucial tip here is to place your stop loss slightly beyond the support or resistance level. This helps you avoid getting shaken out by minor fluctuations or "stop hunts," where price briefly pokes through a well-known level before snapping back.
The Volatility-Based Method with ATR
This is probably the most nuanced strategy of the three. It bases your stop loss on the asset's recent volatility, and the Average True Range (ATR) indicator is the perfect tool for the job.
The ATR measures the average price movement over a specific period. Using it ensures your stop is customized to the instrument's personality—wider for a choppy crypto asset and tighter for a stable blue-chip stock. A common technique is to set your stop loss at a multiple of the current ATR value away from your entry price. A 2x ATR multiple is a popular starting point for many traders.
- Example Scenario: You want to go long on the EUR/USD forex pair, which is currently trading at 1.0750.
- ATR Calculation: The daily ATR is 0.0060. Multiplying this by two gives you 0.0120.
- Stop Placement: Your stop loss would be set at 1.0630 (1.0750 - 0.0120).
This approach is excellent for preventing you from getting stopped out by normal market "noise." You can learn more about how to use the ATR indicator and really dial in this powerful technique.
Getting Your First Stop Loss Set Up in ChartsWatcher
Alright, let's move from theory to action. It's one thing to understand the why behind a stop loss, but actually placing one correctly inside your trading platform is what turns that knowledge into real protection for your account.
We'll walk through exactly how to set up stop losses in ChartsWatcher. The platform is built to be efficient, letting you attach your risk management orders right when you open a trade. This is a critical habit—it ensures you're never in an unprotected position, even for a second.
This is the main interface you'll be working with inside ChartsWatcher when you're ready to put on a trade.
Notice how the layout keeps your stop loss and take profit levels front and center. Good risk management isn't an afterthought; it's a core part of the trade entry itself.
The Order Entry Window: Your Command Center
When you open a new order ticket in ChartsWatcher, you'll see your choices for market, limit, and stop entries. After you've decided on your entry type and position size, your eyes should immediately go to the Stop Loss field. This isn't an optional step to come back to later. It's an integral part of placing the trade.
You have a few ways to input your stop loss:
- Specific Price Level: This is the most direct method. Just type in the exact price where you want the trade to be closed out (e.g., 145.50). It’s perfect when your analysis points to a clear support or resistance level that, if broken, invalidates your trade idea.
- Pips or Ticks: You can also enter the number of pips (for forex) or ticks (for futures) you're willing to risk from your entry price. This is common for strategies that use a fixed risk distance on every trade.
- Percentage: Some traders prefer to set a stop based on a percentage of the asset's price or a percentage of their account capital they're willing to risk.
As you enter a value, the platform will often calculate the potential monetary loss for you in real-time. This provides instant, powerful feedback on whether the risk you're about to take fits within your trading plan's limits. It’s a crucial gut-check before you hit "confirm."
A good stop loss is one that's set with conviction and then left alone. The order window is your final chance to make sure the risk you're about to take aligns perfectly with your overall strategy.
Double-Check That Your Order Is Live
Once you've placed the order, your job isn't quite done. Don't just walk away from the screen.
Navigate over to your Positions or Orders tab within ChartsWatcher. You should see your new live position listed, and, critically, an active stop-loss order linked directly to it.
Verify that the price level is exactly what you intended. A simple typo—entering 1.2500 instead of 1.2600—can be the difference between a small, controlled loss and a much larger, unplanned one. Taking two seconds to double-check that your safety net is in place is one of the most professional habits you can build.
With that confirmed, you can now let the trade play out, knowing your downside is defined and protected.
Advanced Tactics to Protect Your Profits

Once you've got the hang of the basic stop loss, it's time to graduate from simple damage control to actively protecting your profits. A static stop is your defensive line, but advanced techniques let you play offense, locking in gains as a trade runs in your favor.
This is where you shift your mindset from preventing losses to securing wins.
The best tool for this job? The trailing stop. Think of it as a smart stop loss that automatically follows a winning trade. It only moves in one direction—up for a long position, down for a short one—ratcheting up your profit floor every time the price moves your way.
Using a Trailing Stop to Lock In Gains
You can set up a trailing stop in a couple of ways, and the one you choose really depends on the personality of the market and your own trading style.
-
Fixed Amount: This is straightforward. You set a specific dollar or pip amount for the stop to trail the current price. Let's say you set a $2.00 trailing stop on a stock. If the price climbs to $155, your stop automatically shifts up to $153. Should the stock pull back, your stop stays put at $153, guaranteeing you walk away with a profit.
-
Percentage: This approach is more dynamic, adjusting the stop's distance based on the asset's current price. A 5% trailing stop on a $100 stock initially places the stop at $95. If that stock rallies to $120, the new stop moves to $114 ($120 minus 5% of $120). This method is fantastic in strong trends where you want to give the trade plenty of room to breathe.
The real magic of a trailing stop is the automation. It takes the emotion out of the equation, preventing you from bailing on a winning trade too early out of fear. It lets your profits run while keeping a disciplined exit plan firmly in place.
It's also worth noting that while these tools protect your individual trades, their collective use can actually move markets. Cascading stop-loss orders can pour fuel on a price move, a phenomenon we've seen in major market events. On March 7, 2002, a sharp decline in USD/JPY was accelerated by waves of triggered stops, showing how layers of automated orders can amplify volatility. For those interested, you can read the full research on this market behavior from the New York Fed.
Other Dynamic Stop Strategies
The trailing stop is powerful, but it's not the only dynamic tool in the shed. Other fluid techniques can adapt to the market's ever-changing conditions.
One of my personal favorites is using a key moving average, like the 20-day or 50-day EMA, as a dynamic stop-loss line. The rule is simple: as long as the price stays above that moving average, you stay in the trade. Once it closes below, you're out.
Another advanced tactic is the time-based stop. This one isn't about price at all—it's about performance. If a trade hasn't made a meaningful move in your favor within a set timeframe, say, five trading days, you exit. This frees up your capital for opportunities that are actually working.
For a deeper dive, check out our guide on 7 advanced stop-loss strategies that actually work. These methods will give you the flexibility you need to manage your positions with far greater nuance.
Common Stop Loss Mistakes and How to Fix Them
Knowing how to set a stop loss is only half the battle. The other half—the part that trips up even seasoned traders—is knowing what not to do.
Most trading mistakes aren't born from bad strategy but from gut reactions and emotions. We've all been there. Let's walk through the most common blunders I see traders make and, more importantly, how to break those habits for good.
Mistake 1: Placing Stops Way Too Tight
This is the classic rookie mistake. You place your stop, feeling disciplined and responsible. Then, like clockwork, the price dips just enough to tag your stop and take you out of the trade... only to immediately reverse and rocket toward your original price target.
It’s incredibly frustrating, and it happens when you don't give a trade room to breathe. Markets don't move in straight lines; they ebb and flow with normal volatility. A stop loss that’s too close is basically a bet that the market will move perfectly in your favor from the second you enter. Spoiler alert: it almost never does. This isn't risk management; it's just asking to get knocked out by random market noise.
The Fix: Stop guessing and start using a volatility indicator. My go-to is the Average True Range (ATR). Instead of using some arbitrary percentage, try placing your stop at a multiple of the current ATR, like 1.5x or 2x the ATR value below your entry. This approach forces your stop loss to respect the asset's actual recent volatility, putting it outside the range of typical price chatter.
Mistake 2: Setting Stops So Wide They're Useless
On the flip side, some traders get so scared of being stopped out prematurely that they commit an even bigger sin: setting a stop that’s ridiculously wide.
A stop loss that allows for a 20% or 30% loss on a single trade isn't a safety net; it's a gaping hole in the bottom of your account. This usually comes from being overconfident in a trade. You know it's a winner, so you give it all the room in the world. But no matter how good your analysis is, you will be wrong. The market doesn't care about your conviction.
One massive loss like this can wipe out the profits from ten or more winning trades. It’s simply not a sustainable way to trade.
- The Fix: Your max loss should be defined before you even think about hitting the buy button. A solid rule of thumb is to never risk more than 1% to 2% of your total account on any single trade. Figure out that dollar amount first, then place your stop loss accordingly. If that stop level feels too tight based on the chart's volatility, the answer isn't to widen the stop. The answer is to trade a smaller position size.
Mistake 3: Moving Your Stop Loss on a Losing Trade
This is the cardinal sin of risk management, the one thing you must never, ever do.
Your trade starts to go against you. The price creeps closer and closer to your stop loss. Panic sets in. You start telling yourself, "It's just a little pullback, I'll give it more room." And then you do it—you drag your stop loss further down, away from the price.
In that single moment, you've completely defeated the purpose of a stop loss. You’ve just turned a small, defined, and manageable loss into a potentially catastrophic one, all based on hope. It's an emotional decision, plain and simple.
- The Fix: Treat your initial stop loss as if it were set in stone. Once you place it based on objective analysis (like the ATR or a key support level), it should only ever move in one direction: up, to lock in profits on a winning trade. The second you enter a position, you have to fully accept the risk you’ve defined. If you get stopped out, your plan worked. It did exactly what it was supposed to do: it protected you from a much bigger loss. View it as a win for your discipline, not a loss for your ego.
Bringing It All Together for Consistent Results
Mastering the art of the stop loss isn't something you learn overnight. It's an ongoing journey, a discipline you build with every single trade. Honestly, it's the single most important skill for keeping your capital safe and finding any kind of long-term consistency in the markets.
Think of it this way: setting a proper stop loss isn't just about damage control. It’s about building the unshakable foundation that your entire trading plan rests on. Without it, you're just gambling.
We've walked through the core methods traders rely on:
- The Percentage Method: A straightforward way to apply uniform risk across your entire portfolio.
- Support and Resistance: This is where you start aligning your stops with what the market is actually doing.
- Volatility-Based Stops: Using tools like ATR to give your trades the right amount of room to breathe, preventing you from getting shaken out of a good position.
The only way to figure out what really clicks for your personal style is to get your hands dirty. Jump into a demo account and experiment with each of these methods. There's no substitute for seeing how they behave in a live market—without risking a dime. You'll quickly get a feel for which approach gives you the most confidence when it's time to pull the trigger.
Here's the critical mindset shift you need to make: a triggered stop loss isn't a failed trade. It's the successful execution of your risk management plan. This is the perspective that separates the pros from the amateurs and guarantees you'll still be in the game long enough to find your edge. It means your plan worked exactly as it was supposed to.
Your Top Stop Loss Questions, Answered
Even traders with a dialed-in strategy have questions about the finer points of setting stop losses. Let's tackle some of the most common ones I hear. Getting these cleared up can be the final piece of the puzzle for trading with confidence.
Should I Use a Stop Loss on Every Single Trade?
If you're an active trader, the answer is an absolute, unequivocal yes. Think of a stop loss as your non-negotiable safety net for every position you open.
It’s the one tool that automatically protects you from those gut-wrenching market shocks and, just as importantly, from your own worst enemy: emotional decision-making. It’s the bedrock of risk management, ensuring one bad trade doesn't blow a catastrophic hole in your account.
What Is Slippage and How Does It Affect My Stop Loss?
Slippage is that frustrating gap between the price you expect your stop loss to execute at and the actual price it gets filled. In a fast-moving, chaotic market, prices can literally jump right over your stop level.
For example, you might have a stop set at $100, but during a sudden crash, the next available price to sell is $99.85. That difference is slippage. While you can't completely avoid it, you can minimize the risk by being extra cautious around major news releases or other high-volatility events.
When Is It Okay to Adjust My Stop Loss?
This one has a golden rule, and you should never, ever break it. You can adjust your stop loss, but only to lock in profits.
For instance, if you're in a long trade and the price is moving nicely in your favor, you can trail your stop loss up behind it. This is smart trading—it turns your risk-management tool into a profit-protection machine.
The cardinal sin of trading is moving your stop further away from your entry to give a losing trade 'more room to breathe.' That's not a strategy; it's a prayer. It turns a small, manageable loss into a potentially devastating one.
Set your stop based on your initial analysis and stick to it. The only time you touch it is to move it in the direction of your winning trade.
Ready to put this into practice? ChartsWatcher gives you the professional-grade charting and order tools you need to manage your risk with total precision. Start analyzing the market with a free plan today.
